
How to Program a Repeater into the TIDRADIO H9
Front-panel programming, start to finish, with a printable one-page reference. Photographed on a real H9.
~10 min · 0/12 required steps
The H9 is not the H8
If you have followed an H8 guide on an H9 and nothing worked, this is why. The H8 uses one flat list of numbered menu items. The H9 splits everything into two separate menus, and both start numbering at 1. Every screenshot below was photographed on an actual TIDRADIO H9.
Watch it first
The whole sequence in under a minute. The written steps below match it screen for screen.
The one thing that confuses everybody
Two menus, both numbered from 1
What you are setting
You need six values before you start. Look your repeater up on RepeaterBook.com, or check your local club's site — they publish theirs. The example below is the Stone Mountain machine in Georgia; substitute your own.
Settings
| Setting | Example | Where it lives |
|---|---|---|
| Receive frequency | 146.760 MHz | VFO — type it on the keypad |
| Tone type | CTCSS | Program Chann 2 |
| PL tone | 107.2 Hz | Program Chann 2 |
| Bandwidth | Wide | Program Chann 3 |
| TX power | High | Program Chann 4 |
| Offset amount | 0.600 MHz | Program Chann 10 |
| Offset direction | Negative | Program Chann 11 |
| Memory channel | 001 | Program Chann 12 |
The steps
The menu items run in order, so you scroll down Program Chann once, top to bottom, and never go back up. One thing the radio does not tell you: after you highlight a value, press MENU to commit it. BACK leaves without saving. If a setting will not stick, that is almost always why.
Programming sequence
If it will not open the repeater
- Check SET-D first. Wrong offset direction is far and away the most common cause.
- Then the tone. It must be CTCSS, and it must match the published value exactly.
- Then the offset amount. 0.600 MHz on 2 metres, 5.000 MHz on 70 cm.
- Then confirm you actually saved. If you never saw Save OK, it is not stored.
- If you can hear the repeater but cannot open it, the fault is almost always tone or direction — receive works without either of them.
Worth setting once
These live in Radio Setting, not Program Chann, and they apply to the whole radio rather than one channel. Item 1, Squelch LV — Level 1 opens for weak signals without leaving you in constant hiss. Item 2, Step Freq — 5.0K suits most 2 metre repeater spacing. Item 5, TOT — the time-out timer. 180 seconds is a courteous default and stops you holding the repeater open by accident.
Print the reference card
Two pages. The first is a settings card with a blank column to fill in your own repeater. The second is the step-by-step with a photo of every screen. Print it, fill it in, keep it in the bag.
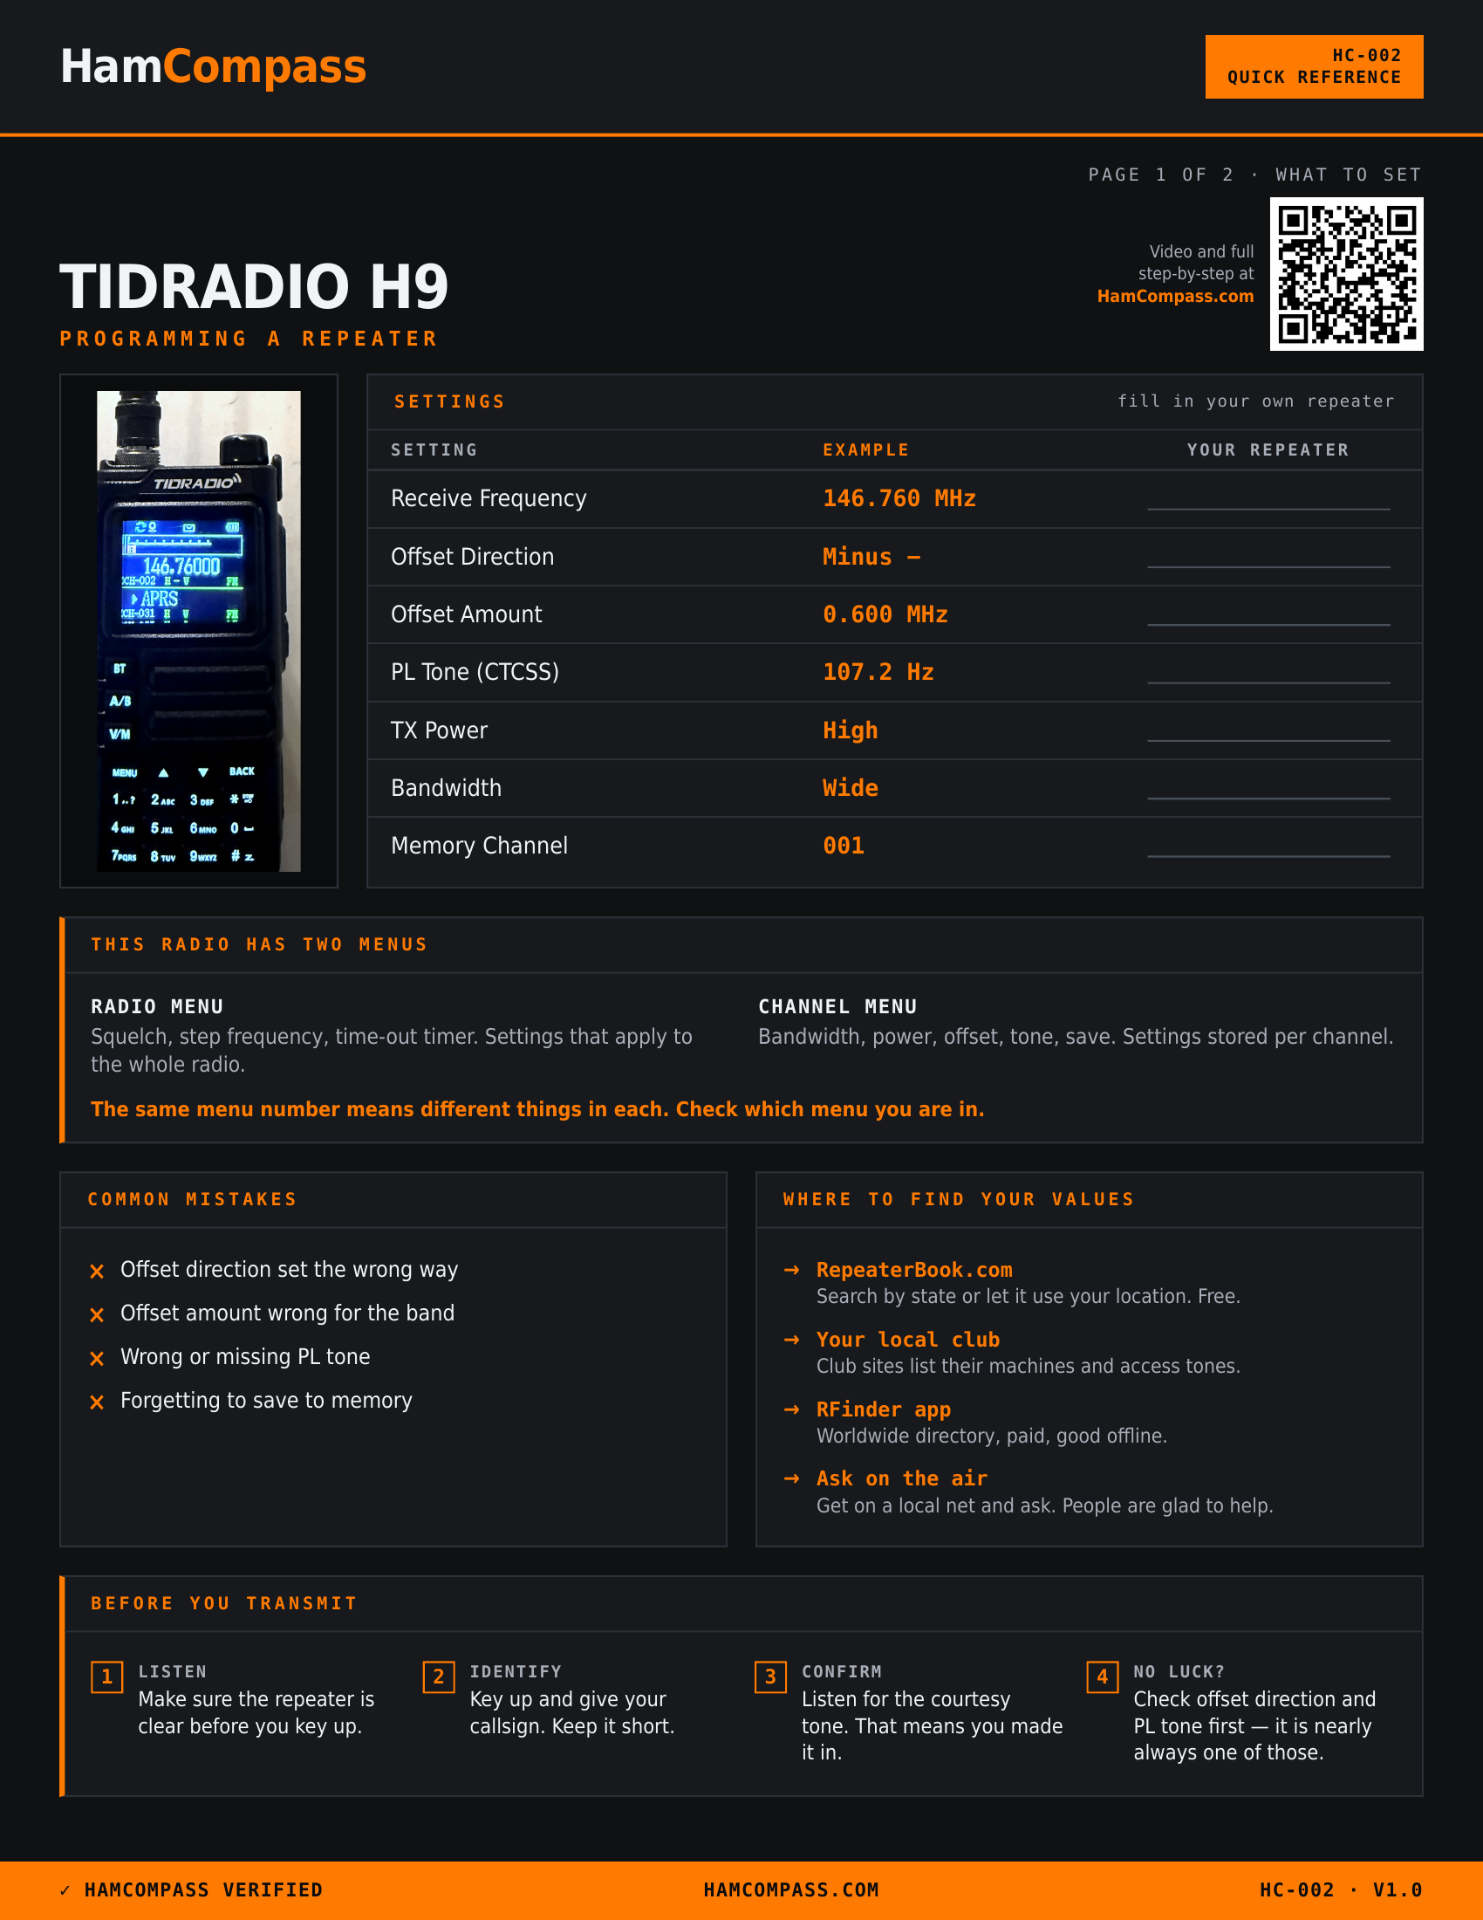
Page 1 — what to set, with a blank column for your own repeater.
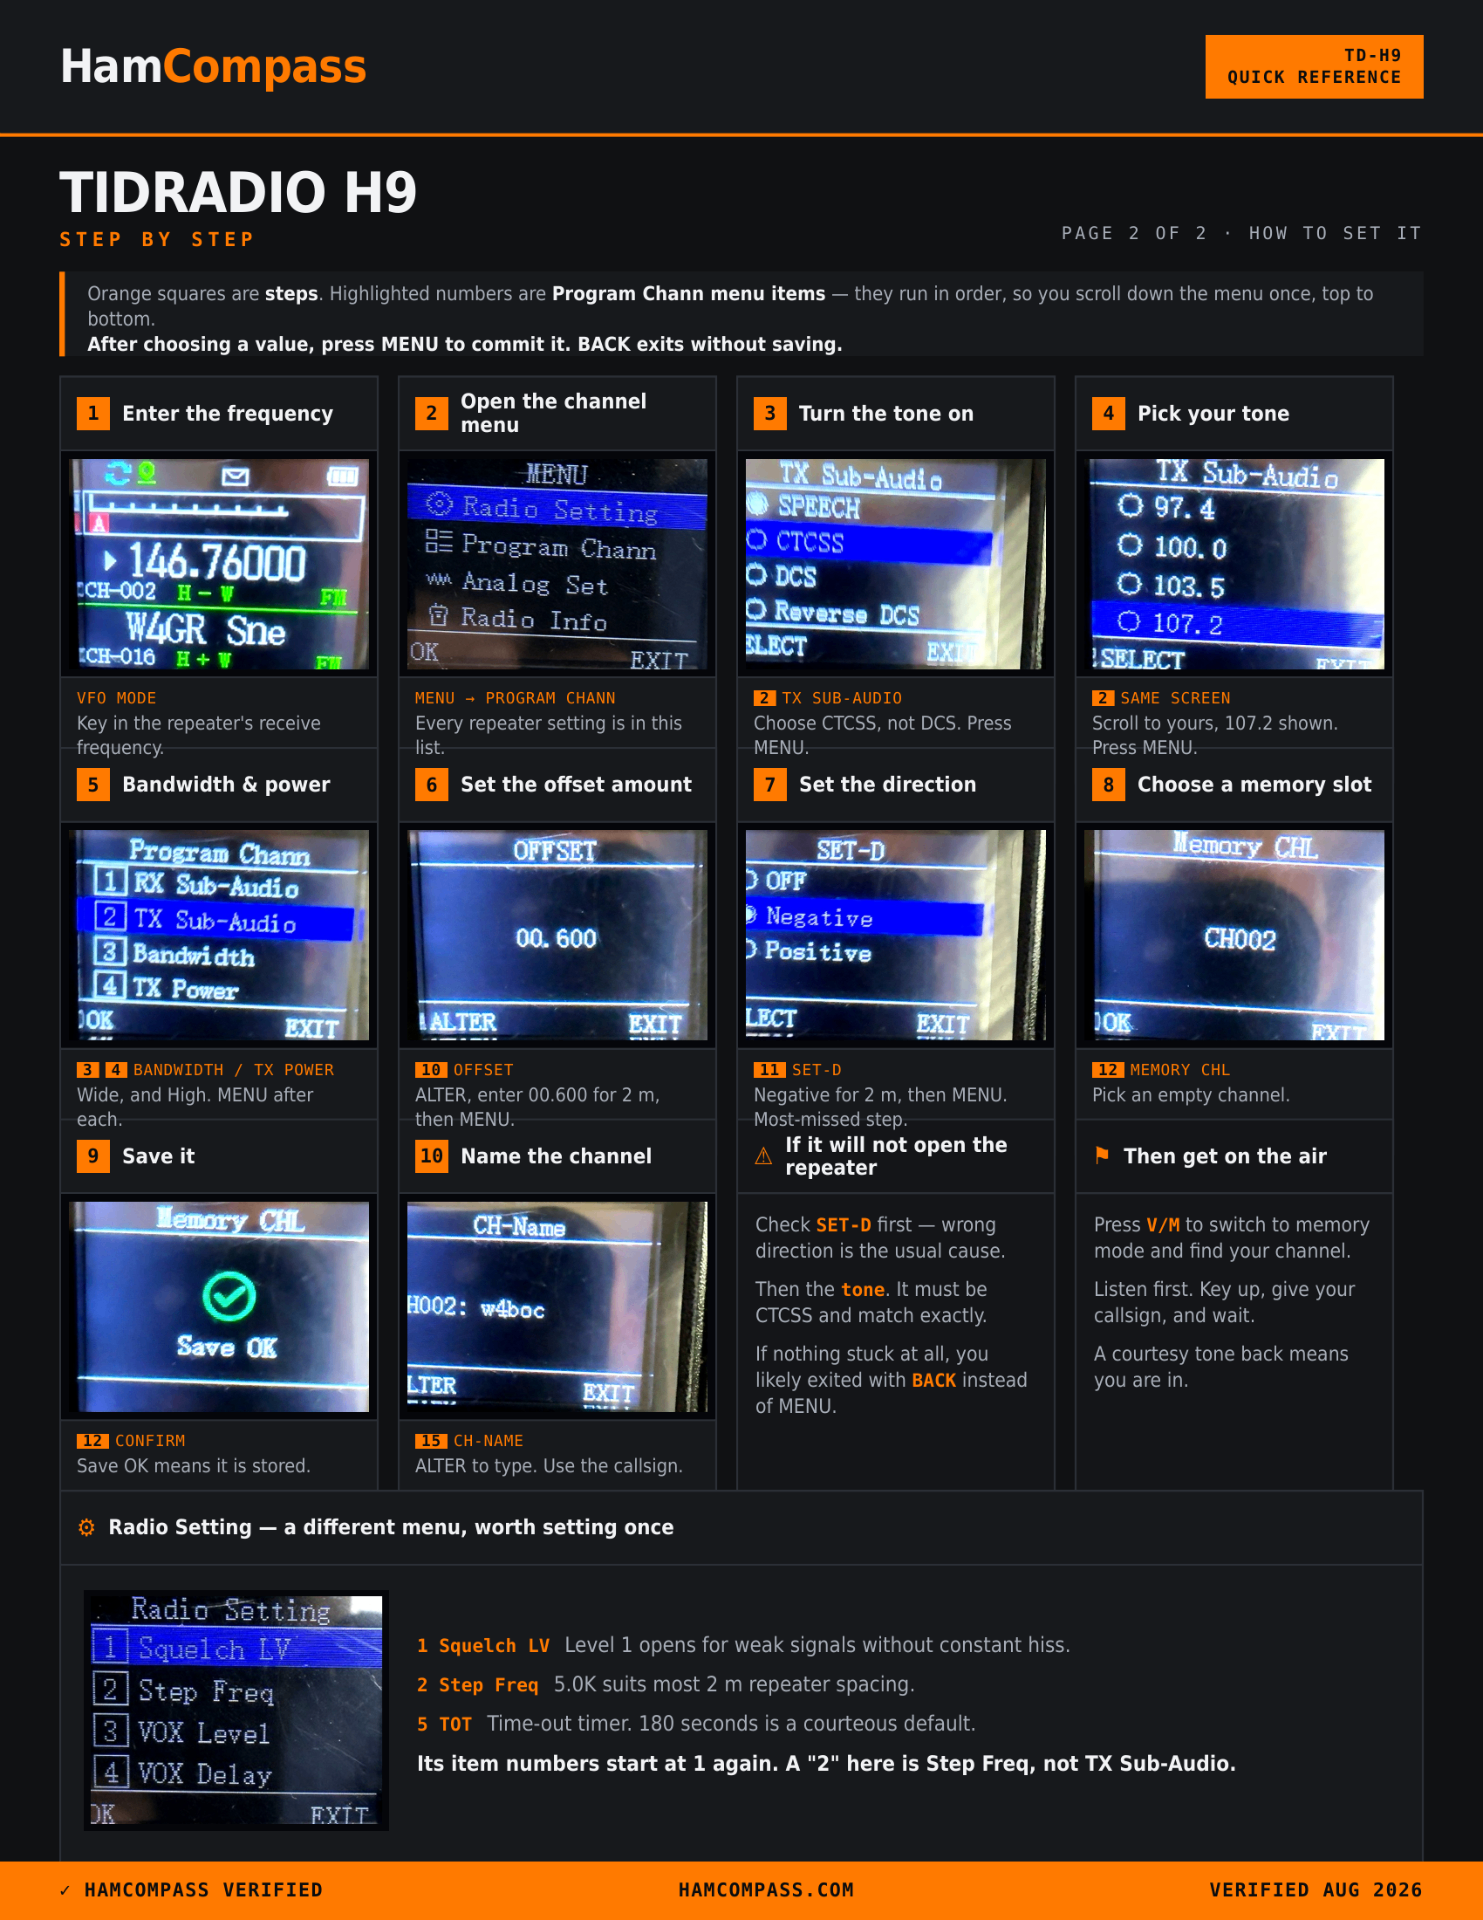
Page 2 — every step, with the actual screen you should be looking at.
The official manual
TIDRADIO publish their own manual for the TD-H9. It covers the menus this guide skips — APRS, GPS, spectrum, Bluetooth programming and the full CTCSS table. Worth having, though it is written as a reference rather than a walkthrough, which is the gap this page fills.
TIDRADIO manual downloads (official)
TIDRADIO emails the file to you. Choose the TD-H9 ham version.
Open link ↗TD-H9 user manual on ManualsLib
Readable in the browser if you would rather not hand over an email address.
Open link ↗Doing this more than once?
Front-panel programming is fine for one repeater. For twenty, build your list in Radio Memory Manager and load it with CHIRP or ODmaster in one pass. Free with a HamCompass account, and your list stays saved.
Open Radio Memory Manager ↗HamCompass · N4CRP
HamCompass Verified · checked August 2026 — links and steps reference third-party sites that may change; verify against the official source linked above.